Crowd Mixer is a Blender add-on built to populate a scene with believable crowds fast,
then let you refine only the parts that actually matter for the final shot. Crowds are generated with
Geometry Nodes, characters are built from modular parts with Mixamo
animation support, and everything can be placed precisely with Blender's 3D cursor.
In version 2.0, the whole workflow was reorganized around three main panels -
Crowd Manager, Character Customization and Preset Collection
- so you move from building a character, to sourcing it, to generating a crowd, without jumping around.
The main panels
Crowd Manager is the central hub for every crowd in the scene. At the top,
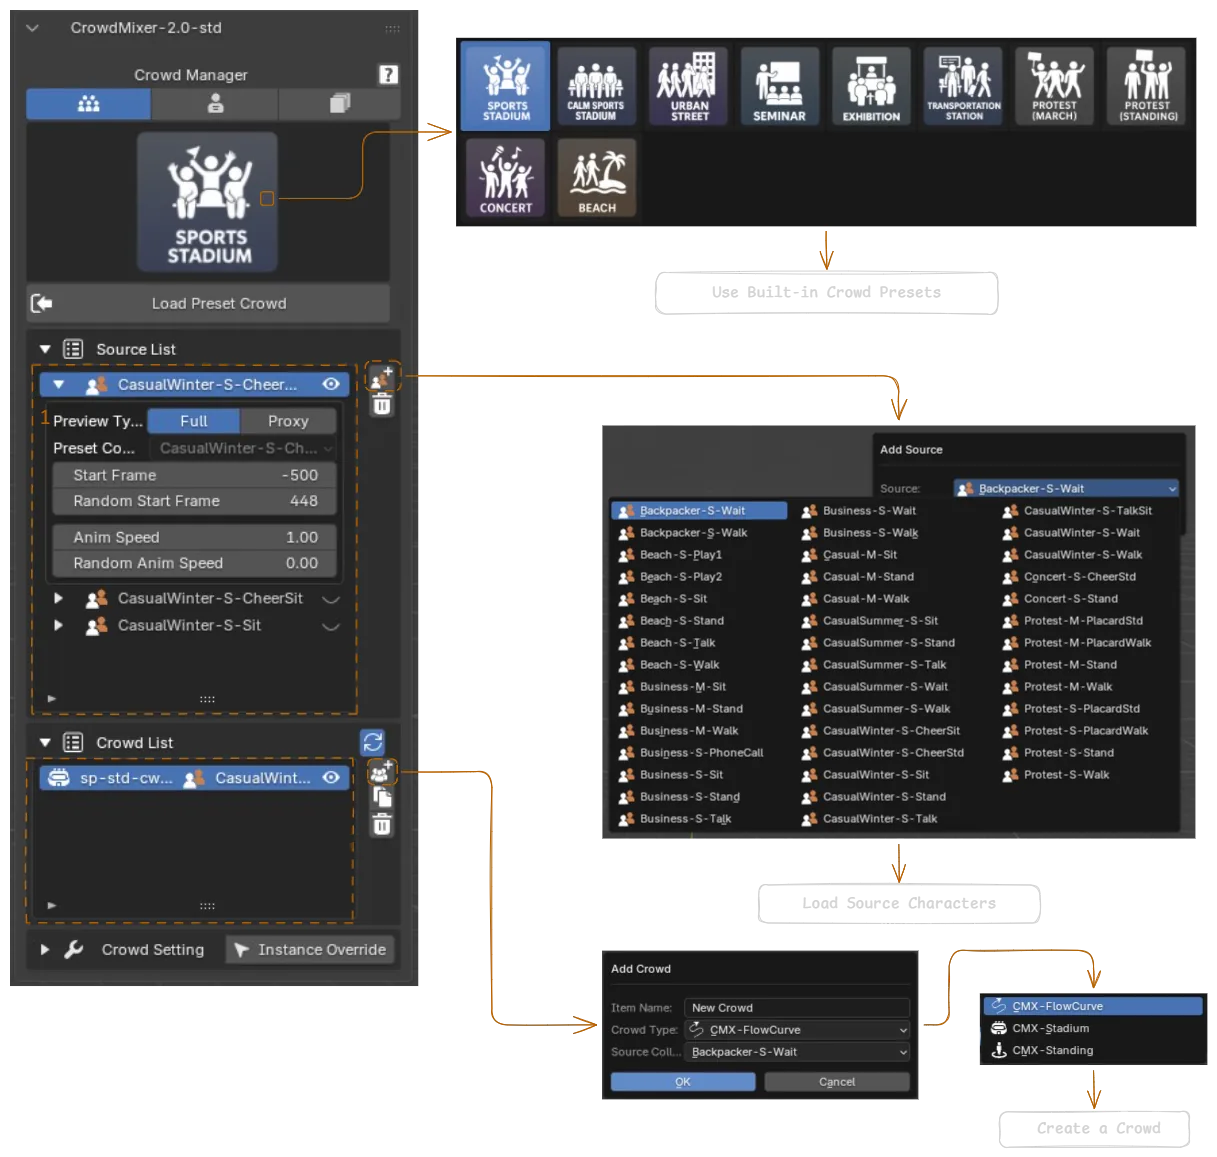
Load Preset Crowd drops in a complete pre-built setup - stadium, transportation, concert,
beach and more - in one click, which is both the fastest way to start and a good way to see how Crowd
Mixer works behind the scenes. Below it, the Source List holds the character sources:
crowds don't pull data directly from Character Customization, they use source files that
have already been built - think of a source as a ready-to-use character library for your crowds. The
Crowd List shows every crowd currently in the scene, and selecting one opens its
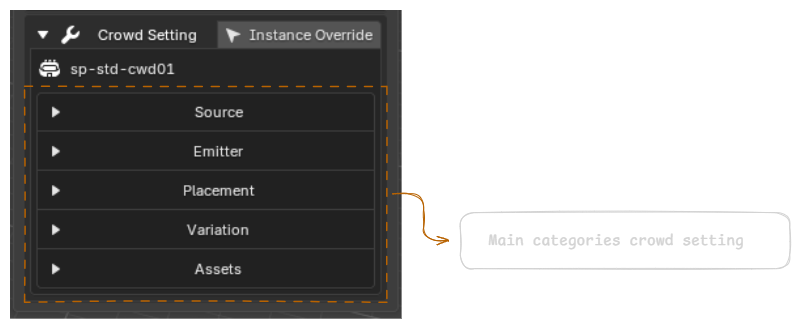
Crowd Setting, reorganized in 2.0 into five categories - Source, Emitter,
Placement, Variation and Assets. Most of these settings are shared across all crowd types, but
a few differ: a Stadium crowd, for instance, doesn't use a Density value at all - its character count
comes from the Base and Seat settings under Placement instead.
Character Customization is where individual characters are built before they ever reach
a crowd. Crowd Mixer supports two character types: Single Mesh, pre-built and lightweight
so it's optimized for large crowds but cannot be customized, and Modular Mesh, which
unlocks hairstyles, clothing, body shapes and animations for far greater variation. Once a character looks
right, save it as a Preset.
Preset Collection is where saved presets become your own reusable character library.
Use Build to turn a whole collection into a source file in one step - then load that
source back into a scene from the Source List in Crowd Manager.
Standout features
Multi-source crowds - a single crowd can mix up to four sources (one main plus three "mixed" sources) inside one crowd node, for much more visual variety than a single character pool.
Proxy Mode - swap to simplified characters in the viewport once a crowd gets heavy; the final render always uses full-quality assets regardless of what's shown in the viewport.
Instance Override - one of the biggest additions in 2.0: edit a specific character at an individual position - fixing a repeated look or overriding its flow speed - without regenerating the entire crowd.
Things to watch out for
Turn off Customize ON before creating a Source or Crowd item, and before saving the scene - leaving it active during either can cause character data conflicts or overwriting errors.
Crowd Mixer won't let the same source be added twice to a crowd, to keep the Source List organized.
Before enabling Aim under Placement, apply transforms to the emitter object first - otherwise the aim direction is calculated incorrectly.
What's New in Crowd Mixer 2.0
Crowd Mixer 2.0 updates the workflow to be faster and more production-friendly. The add-on now
focuses more clearly on rapid scene population plus selective manual control where it matters.
Single Mesh workflow gives a faster route to usable crowds and is central to Lite.
Multi-source crowds - a single crowd can now combine up to four sources (one main plus three mixed) for far more visual variety in one node.
Reorganized crowd settings - the Crowd Setting panel is now grouped into five categories: Source, Emitter, Placement, Variation and Assets.
Instance Override makes it easier to edit one character at an individual position - fixing repeats or overriding flow speed - without regenerating the whole crowd.
Proxy Mode and visibility tools help keep heavier scenes manageable; the final render still uses full-quality assets.
Cleaner UI structure organizes the workflow around Crowd Manager and practical subpanels.
The main idea in 2.0 is simple: place crowds faster first, then refine only the parts that affect the final shot.
Versions and Workflows
Crowd Mixer 2.0 is divided into Lite and Standard. The difference is not just pricing; it changes
how deep you can go with character setup and customization.
Feature
Lite
Standard
Main workflow
Single Mesh
Single Mesh and Modular Mesh
Single-mesh characters
91 characters across 7 themes
91 characters across 7 themes
Modular system
Not included
2 base characters with 196 parts and options
Core tools
Presets, Snap, Proxy, Override
Presets, Snap, Proxy, Override
Lite is the fast scene-building version focused on Single Mesh characters.
Standard adds the deeper Modular Mesh workflow for more directed customization.
Installation
System requirements: Blender 4.1 or higher on Windows, macOS or Linux.
Download the Crowd Mixer .zip package from your Blender Market purchase. Do not extract the zip file - install it in Blender as-is.
Open Edit > Preferences > Add-ons.
Click Install, locate the downloaded zip file and select it, then click Install Add-on.
Tick the checkbox next to the add-on's name to enable it.
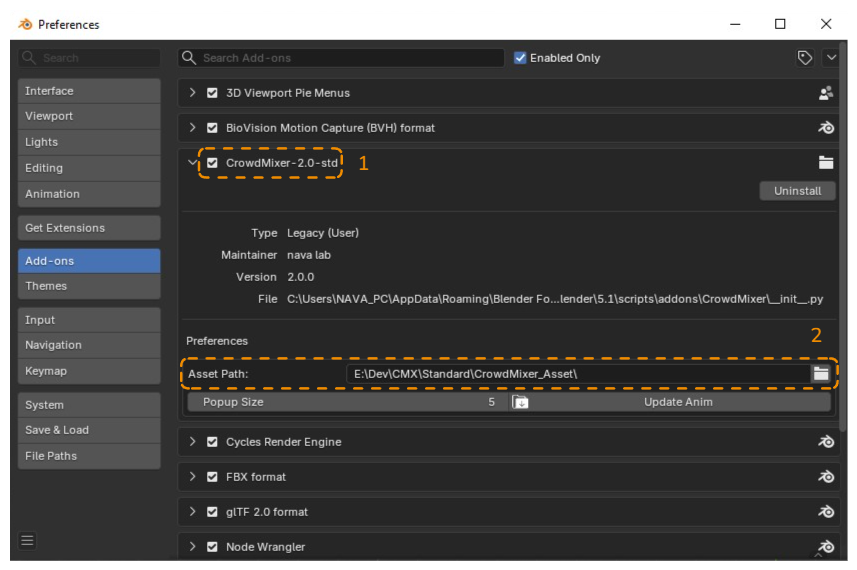
In the add-on preferences, set the Folder Path to the directory that contains your characters, clothing and animations.
If characters or presets do not appear after install, the first thing to verify is the asset folder path.
Getting Started
This section is for first-time users of Crowd Mixer. It walks through the core workflow -
from setup, to character customization, to crowd creation - so you can start using the add-on efficiently.
Tips for an efficient workflow: use Presets when working across multiple characters or themes;
use Crowd Presets when you want a full crowd-and-animation setup in one step; combine multiple Crowd Types
in the same scene for more complex results.
Enable the add-on and set the Asset Path
1. Enable the Add-on
Install the .zip file via Edit > Preferences > Add-ons > Install, search for "Crowd Mixer" and enable it.
2. Set Up the Asset Folder
Go to Edit > Preferences > Add-ons.
Search for Crowd Mixer and expand its settings.
In Preferences, set the Asset Path to the directory containing your models and animations.
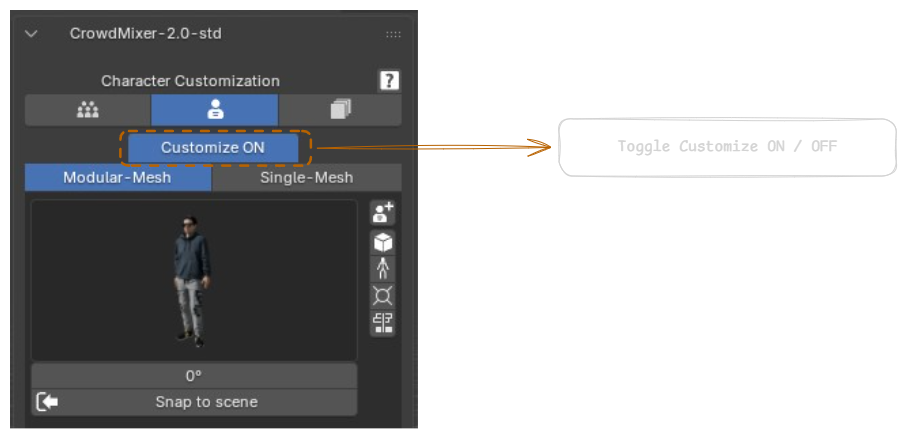
Customize ON
3. Turn on Customize ON
Click Customize ON to load the active character. This unlocks the character editing menus and loads the assets needed to edit it.
Precautions: do not enable Customize ON while creating a Source or Crowd item, and avoid saving
the scene while it's active - doing so may cause character data conflicts or overwriting errors. Switch it off
before creating a source or saving the scene.
Customizing a character
4. Customize Your Character
Use the Character Customize panel for full control over appearance and behavior:
Head - hairstyles, hair colors, face shapes and facial details.
Body - body shape (thin, muscular, full-bodied) and skin tone.
Clothing - outfits, randomized combinations, and per-item on/off toggles.
Animation - assign animations by category (walking, standing, special movement); Mixamo animations are organized for quick preview and selection.
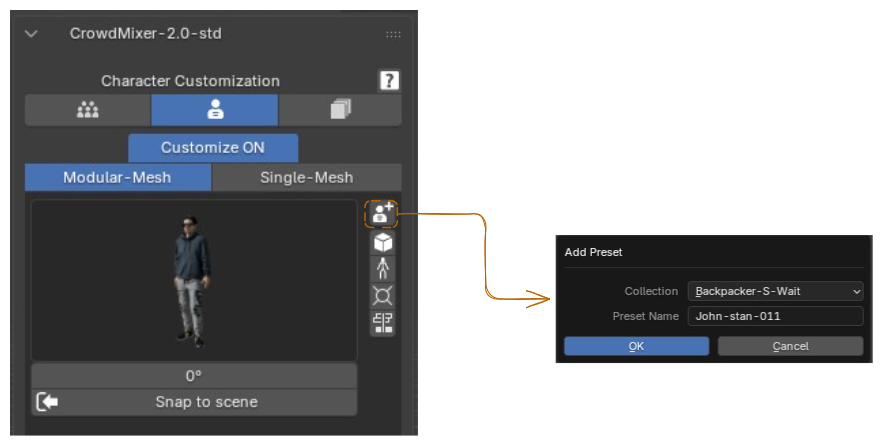
Save as Preset
5. Save as Preset
Click the (+) icon next to the character preview to save it as a preset.
Presets store all visual and animation settings.
Organize multiple presets into Preset Collections (e.g. "Office Workers", "Performers", "Festival Set").
Presets can later be reapplied instantly, or used as sources for generating crowds.
Apply a preset, or Build the collection into a source
6. Explore Preset Collections
Browse built-in or user-made character sets from the Preset Collection menu.
Click Apply to load one as the active character.
These presets are optimized to be compatible with the different Crowd Types and random distribution systems.
7. Build the Source File
Crowds don't pull data directly from Character Customization - they use a prepared source file. In the
Preset Collection panel, click Build to generate one from your presets. The file is
stored in the CMX_source folder under the same name as the preset collection.
Add Source, create a crowd, or load a crowd preset
8. Load Source Characters
Open the Source List and click (+) Add Source to load the built source file into your scene (a single crowd can combine up to four sources - one main plus three mixed).
These characters are used by the crowd system for variation.
Adjust Start Frame / Random Start Frame for varied animation timing, and Anim Speed / Random Anim Speed for playback speed diversity.
9. Create a Crowd
Open the Crowd List and click (+), then choose a Crowd Type:
Standing - static or lightly randomized placement for open spaces and exhibitions.
Stadium - curve-based first-row seating and section divisions, ideal for tiered layouts.
Flow Curve - characters follow a defined path, for walking or moving groups.
Use the Crowd Setting panel to control density, randomness, animation speed and more.
10. Use Built-in Crowd Presets (optional but recommended)
Crowd Presets are ready-made setups that generate a complete scene - characters, layout system and animation -
in one step. You can still modify every part after loading: swap source characters, adjust density, or refine placement.
Go to the Crowd Manager section in the Crowd Mixer panel.
Select a preset from the Preset Preview Panel.
Click Load Preset Crowd.
The add-on generates both the character source and the crowd layout.
User Interface
Crowd Mixer 2.0 is organized around the Crowd Manager and related control panels.
The interface is designed so you can move from preset loading, to source selection, to crowd adjustment
without jumping around unnecessarily.
This area gathers the main setup tools for presets, sources, lists, Single Mesh access and node controls.
This area focuses on per-character visual changes such as head, body, clothes and animation choices.
The preset list is the quickest entry point when you want the add-on to match a familiar environment immediately.
Preview Popup Size adjusts the size of the character preview popup window, for a clearer view when checking proportions.
Update Animation reloads the animation library for the current character - use it after adding or changing animation files in the asset folder.
Open Document opens the Crowd Mixer user guide in your default browser.
Crowd Manager
Crowd Manager is the operational center of Crowd Mixer. It is where you start a scene,
inspect loaded sources, manage created crowds and reach the node-specific controls.
Where each function lives in Crowd Manager
Load Preset Crowd - loads a ready-made crowd preset (e.g. Sports Stadium, Urban Street, Concert) in one click.
Source List adds, removes and configures the character sources that feed the crowd.
Crowd List defines the crowd type and adjusts character count, positioning and behavior for every crowd object in the scene.
Selecting a crowd in the Crowd List reveals two tabs at the bottom: Crowd Setting (the settings panel for the selected crowd's node type) and Instance Override (per-instance edits).
Crowd presets
Crowd presets are ready-made crowd setups that let you instantly generate complete scenes with
characters, layout systems and animation settings - all in one step. They simplify the process
and reduce setup time by removing the need to configure every character manually.
Where to find it: Preset Crowd picker + Load button
Preset name
Description
Sports Stadium
Seated audience for sports or large events with cheering animation.
Calm Sports Stadium
Seated stadium audience with idle/calm animation instead of cheering.
Urban Street
Street-level scene with walking and standing pedestrians.
Seminar
Seated audience in a seminar, classroom or conference.
Exhibition
Groups of people casually standing and talking indoors.
Transportation Station
Characters moving or waiting in a station-like environment.
Protest (March)
Marching protest scene with signs and dynamic flow.
Protest (Standing)
Stationary protest with a dense and unified formation.
Concert
Large crowd facing a stage, ideal for performances.
Beach
Relaxed scene with scattered people along a shoreline.
How to use
Go to the Crowd Manager section in the Crowd Mixer panel.
Select a preset from the Preset Preview Panel.
Click Load Preset Crowd.
The add-on generates both the character source and the crowd layout.
You can still modify every part of the preset afterward - swap source characters, adjust density, or refine placement to fit the scene.
Source list
The Source list is where you manage all character sources used in crowd generation. Each source
represents a preset character with specific appearance, animation and style settings, and serves
as the foundation for creating diverse and dynamic crowds. You can freely add, remove or configure
sources depending on your scene requirements.
Activating a source (Active Source) may cause the program to lag temporarily, as the system needs
to load character models and textures into memory. Please wait until loading finishes.
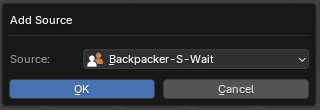
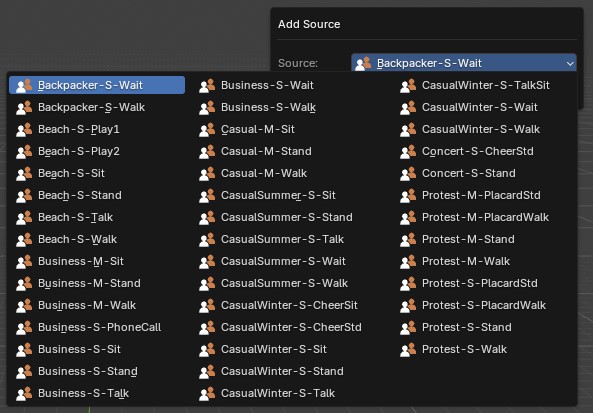
Where each field lives in the Source ListAdd Source dialogAvailable sources, grouped by theme (Backpacker, Beach, Business, Casual, CasualSummer, CasualWinter, Concert, Protest...)
Source Item
Displays the status and control options for each character source used in the crowd system. Toggle visibility in the 3D Viewport to manage performance and scene clarity.
Add / Remove
Add - opens the Add Source dialog to pick a character source. Built source files (created via the Preset Collection's Build function) appear in this list to load them into your scene.
Remove - remove the selected source from the system.
To keep things organized, Crowd Mixer prevents the same source from being added multiple times.
Multiple sources per crowd
In Crowd Mixer 2.0, a single crowd can use up to four different sources - one main
source plus three additional mixed sources. This lets you combine characters from multiple sources
inside a single crowd node, creating much more variety.
Preview Type
Choose how the character source is displayed in the 3D Viewport:
Full - high-resolution preview.
Proxy - low-polygon version for optimized performance.
Even when working in Proxy Mode, characters are rendered in their normal full version (not proxy) during final output.
Presets Collection
Displays the name of the Preset Collection that the character source was created from.
Start Frame / Random Start Frame
Sets the animation's starting frame, and randomizes the starting frame per character to prevent uniform movement across the crowd.
The time range of each animation may vary - manually adjust the timeline to make sure it fully covers the playback duration of all animations.
Anim Speed / Random Anim Speed
Sets animation playback speed, and applies slight per-source random variation to it, creating more natural and less repetitive crowd motion.
Crowd list
The Crowd list lets you create and control crowd groups in your scene. Each crowd item is linked
to a character source and a crowd generation system (a Crowd Node Type). This section lets you
adjust settings such as crowd type, density, positioning and behavior - giving you full control
over how your crowd appears and moves.
Where each function lives in the Crowd List
Crowd Item
Displays the status and control options for each crowd group created in the scene. Each item shows:
The name of the source character used.
The type of crowd system applied (Crowd Node Type).
A visibility toggle for showing or hiding the crowd in the 3D Viewport.
Sync crowd selection keeps the highlighted row in step with whichever crowd object is selected in the 3D Viewport.
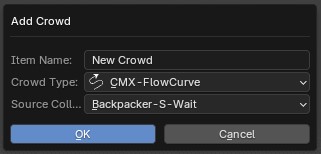
Add Crowd dialogCrowd Type options
Add / Duplicate / Remove
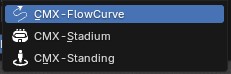
Add - opens the Add Crowd dialog. Set an Item Name, choose a Crowd Type (CMX-Standing, CMX-Stadium or CMX-FlowCurve) and a Source Collection.
Duplicate - copies the selected crowd item, including its Crowd Setting values, as a starting point for a new one.
Remove - deletes the selected crowd group only; the source character remains unaffected.
Crowd Setting
A settings panel for customizing each crowd group, opened via the Crowd Setting tab at
the bottom of Crowd Manager. Available settings depend on the selected Crowd Node Type and are grouped
into five categories - Source, Emitter, Placement, Variation and Assets - each of which can be expanded
or collapsed to keep the interface tidy. The adjacent Instance Override tab switches to
per-instance editing for the same crowd.
Single Mesh
Single Mesh is one of the key workflow additions in Crowd Mixer 2.0. It gives a faster
route to usable results and is the main workflow in the Lite version.
Best when you need to populate a scene quickly.
Works well with presets and fast viewport iteration.
Single Mesh characters are pre-built and lightweight, optimized for large crowds - their appearance (body, face, clothing) cannot be customized.
Animation selection still works the same as Modular Mesh - pick a category and Apply an animation to the character.
Single-Mesh panelFilter by theme
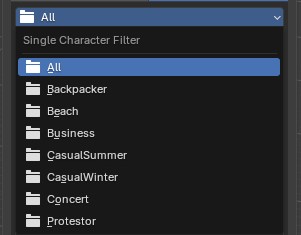
The character list is filtered by theme - All, Backpacker, Beach, Business, CasualSummer,
CasualWinter, Concert, Protestor - covering the full Single Mesh library (91 pre-built
characters across these 7 themes).
Random appearance variation (face, skin, hair, pattern) in the crowd Variation settings
only works with Modular Mesh characters. If you need per-character appearance variation,
build the source from Modular Mesh presets instead of Single Mesh.
Crowd Setting and Crowd node type
The Crowd Setting panel changes based on the active crowd setup. It exposes the values that matter
for the currently selected node type, so a Stadium crowd and a Flow Curve crowd do not show the exact same controls.
In Crowd Mixer 2.0 the entire layout was redesigned to make everything easier to find and customize.
Settings are organized into five main categories:
The five Crowd Setting categories
Source
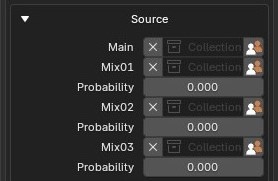
A single crowd can use up to four sources: Main (always used) plus Mix01, Mix02 and Mix03, each with its own Probability value controlling how often that mix replaces the main character - combining characters from multiple sources inside one crowd node.
Emitter
Defines where and how the crowd is generated. Available options depend on the crowd type (grid, curve or mesh for Standing; curve for Flow Curve and Stadium).
Placement
Controls how characters are arranged - transforms and distribution for a more organized or more natural layout, plus an aim object for a shared focal point.
Variation
Adds diversity via Random (faces, skin, hairstyles, clothing patterns - Modular Mesh only) and Color Theme (clothing material color variation).
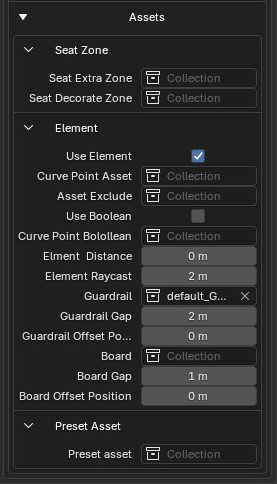
Assets
Additional assets used alongside the crowd - props attached to individual instances (chairs, tables) or larger scene elements (buildings, stages, fences).
Most settings are shared across all crowd types, but some options vary depending on whether you're using a Standing, Flow Curve or Stadium crowd - for example, Stadium crowds don't use a Density value; the crowd count instead comes from the Base and Seat settings under Placement.
Before using an Aim object in Placement, apply transforms to the emitter object first - otherwise the aim direction will be calculated incorrectly.
This section also includes tools for more selective adjustment, including Instance Override.
Stadium Crowd
Stadium Crowd is designed for arenas, stadiums and other seated venues. It uses a curve as its
emitter to define the overall shape of the audience area - the crowd count isn't controlled by a
Density value like other crowd types, but by the Base and Seat
settings under Placement. This gives a quick base stadium setup that you can refine further by
adjusting spacing, adding sections, or enhancing the environment.
Source
Source
Shared across all crowd types: Main plus Mix01 / Mix02 / Mix03, each with its own Probability of replacing the main character.
Emitter
Emitter
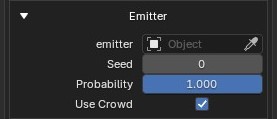
emitter - the object/curve that defines the stadium for the crowd.
Seed - seed value for emitter randomness.
Probability - likelihood that a character is placed at each point on the emitter path.
Use Crowd - toggle to activate character generation for this emitter.
Placement
Placement > Transforms
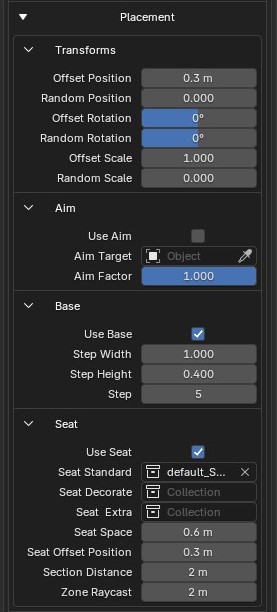
Offset Position / Random Position - base offset and added variation for instance placement.
Offset Rotation / Random Rotation - fixed rotation applied to all characters, plus per-character randomness.
Offset Scale / Random Scale - scale multiplier applied to all characters, plus per-character randomness.
Placement > Aim
Use Aim - enable characters to face a specific direction or object.
Aim Target - the object characters will look at.
Aim Factor - how strongly characters rotate toward the Aim Target.
Placement > Base
Use Base - enable the basic stadium structure layout.
Step Width - horizontal spacing between characters.
Step Height - vertical spacing between rows.
Step - number of step rows (useful for stadium tiers).
Placement > Seat
Use Seat - enable the seat placement system.
Seat Standard - collection of standard seats used in the layout.
Seat Decorate - collection of decorative seat objects.
Seat Extra - collection of an additional/reserved seat type.
Seat Space - distance between seats.
Seat Offset Position - offset applied to the seat base position.
Section Distance - spacing between seating sections.
Zone Raycast - range for detecting seat zone placement via raycast.
Variation
Variation > Random
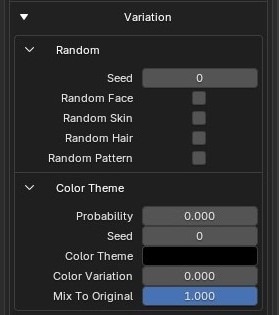
Seed - controls the randomness of all variation options below.
Random Face / Skin / Hair / Pattern - toggles random variation per attribute: facial features, skin tone, hair style/color, and clothing texture/print variants. Works with Modular Mesh characters only.
Variation > Color Theme
Probability - the chance that override color settings will be applied to a character.
Seed - shuffles color outputs randomly while keeping consistency.
Color Theme - the base color palette applied to the crowd (e.g. team or brand color).
Color Variation - degree of randomness added to the override color values.
Mix To Original - blend factor between the original character color and the override color.
Assets
Assets > Seat Zone
Seat Extra Zone - collection for an area used to assign additional seat types.
Seat Decorate Zone - collection for an area used to place decorative seats.
Assets > Element
Use Element - toggle to enable environmental or decorative elements.
Curve Point Asset - collection spawned along points of a curve.
Asset Exclude - collection excluded from placement.
Use Boolean / Curve Point Boolean - enable and assign a collection for boolean operations that cut or shape the base structure.
Element Distance - distance between elements and crowd points.
Element Raycast - detection range for placing elements based on nearby geometry.
Guardrail / Guardrail Gap / Guardrail Offset Position - guardrail asset, its spacing and positioning offset.
Board / Board Gap / Board Offset Position - signboard/banner object, its spacing and positioning offset.
Assets > Preset Asset
Preset asset - collection associating this crowd with a specific preset asset collection.
Standing Crowd
Standing Crowd is a stationary crowd positioned in open areas like public squares, festivals or
outdoor gatherings. Characters may perform idle actions such as chatting, looking around, or
expressing emotions to create a more lifelike scene.
Source
Source
Shared across all crowd types: Main plus Mix01 / Mix02 / Mix03, each with its own Probability of replacing the main character.
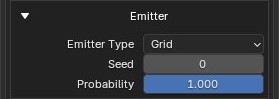
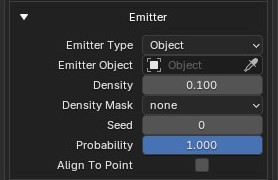
Emitter - GridEmitter - Object
Emitter
Emitter Type switches the fields below between two modes:
Grid - Seed and Probability only; characters are distributed on an even grid.
Object - Emitter Object (the object whose geometry is used), Density, Density Mask (an optional mask limiting where characters spawn), Seed, Probability, and Align To Point (spawn directly on mesh vertices/curve points instead of distributing across the whole surface).
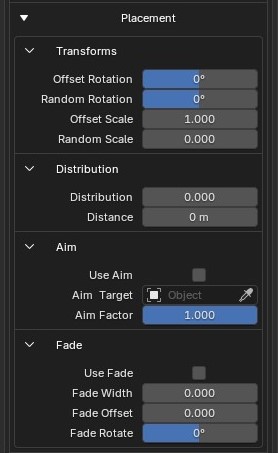
Placement
Placement > Transforms
Offset Rotation / Random Rotation - fixed rotation applied to all characters, and per-character variation for realism.
Offset Scale / Random Scale - base scale multiplier, and per-character scale variation to break uniformity.
Placement > Distribution
Distribution - the overall pattern of character spread (clustering vs. uniform spacing).
Distance - distance between characters, useful for even spacing or avoiding collisions.
Placement > Aim
Use Aim - enable aiming behavior so characters face a specific target.
Aim Factor - how strongly characters rotate toward the Aim Target (0 = ignore, 1 = full aim).
Placement > Fade
Use Fade - enables a fading effect that gradually reduces crowd density.
Fade Width - the length of the fade zone.
Fade Offset - where the fade zone starts, relative to the emitter.
Fade Rotate - the orientation of the fade direction.
Variation
Variation > Random
Seed - controls the randomness of all variation options below.
Random Face / Skin / Hair / Pattern - toggles random variation per attribute: facial features, skin tone, hair style/color, and clothing texture/print variants. Works with Modular Mesh characters only.
Variation > Color Theme
Probability - the chance that override color settings will be applied to a character.
Seed - shuffles color outputs randomly while keeping consistency.
Color Theme - the base color palette applied to the crowd.
Color Variation - degree of randomness added to the override color values.
Mix To Original - blend factor between the original character color and the override color.
Assets
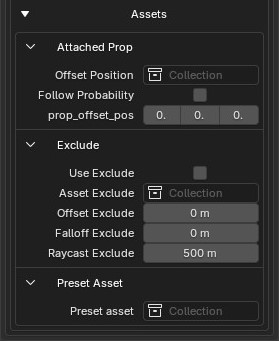
Assets > Attached Prop
Offset Position - a collection of prop objects (e.g. a chair) attached to each character's position in the crowd.
Follow Probability - chance that a given character receives the attached prop.
prop_offset_pos - X / Y / Z positional offset for the attached prop relative to the character.
Assets > Exclude
Use Exclude - activate exclusion logic to prevent characters from spawning in certain areas.
Asset Exclude - a collection defining an exclusion zone (e.g. barrier or stage).
Offset Exclude - expands the exclusion area by a fixed margin.
Falloff Exclude - adds a gradient falloff to the exclusion boundary for smoother transitions.
Raycast Exclude - maximum range for raycast detection to apply exclusions, based on scene geometry.
Assets > Preset Asset
Preset asset - collection associating this crowd with a specific preset asset collection.
Flow Curve Crowd
Flow Curve Crowd is a moving crowd that follows a predefined path using a curve. It's ideal for
simulating walking pedestrians, parade routes, or passengers moving through transportation hubs.
Source
Source
Shared across all crowd types: Main plus Mix01 / Mix02 / Mix03, each with its own Probability of replacing the main character.
Emitter
Emitter
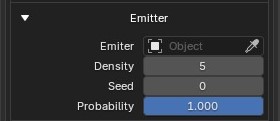
Emitter - the curve object that defines the flow path for the crowd.
Density - how many characters are placed per unit length along the curve.
Seed - random seed to vary spacing and character position along the curve.
Probability - chance of placing a character at each emitter point.
Placement
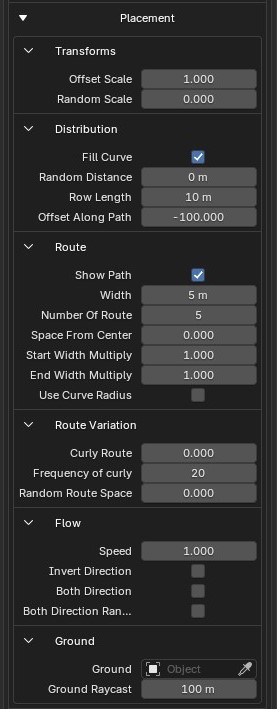
Placement > Transforms
Offset Scale / Random Scale - fixed base scale for all characters, plus per-character variation.
Placement > Distribution
Fill Curve - evenly fill characters along the entire curve path.
Random Distance - adds variation to spacing between characters along the path.
Row Length - controls how long each row is before repeating the pattern.
Offset Along Path - shifts the entire crowd's starting point along the curve.
Placement > Route
Show Path - toggle visibility of the crowd path curve in the 3D Viewport.
Width - total width between the first and last row of the crowd formation.
Number Of Route - number of rows of characters created across the width.
Space From Center - offset distance outward from the curve's center line.
Start Width Multiply / End Width Multiply - adjust width expansion or contraction at the start and end of the curve.
Use Curve Radius - follow the curve's own radius/bevel setting instead of the Width value above.
Placement > Route Variation
Curly Route - adds wave-like, side-to-side variation to the route lines.
Frequency of curly - how often the wave pattern appears along the route.
Random Route Space - adds spacing irregularity between different rows/routes.
Placement > Flow
Speed - movement speed of characters along the curve.
Invert Direction - reverses the flow direction of the entire crowd.
Both Direction - allows characters to move in both directions along the same path.
Both Direction Random - assigns movement direction per character randomly (some forward, some backward).
Placement > Ground
Ground - the object used as ground for alignment.
Ground Raycast - the maximum raycast distance used to align characters to the ground surface.
Variation
Variation > Random
Seed - controls the randomness of all variation options below.
Random Face / Skin / Hair / Pattern - toggles random variation per attribute: facial features, skin tone, hair style/color, and clothing texture/print variants. Works with Modular Mesh characters only.
Variation > Color Theme
Probability - the chance that override color settings will be applied to a character.
Seed - shuffles color outputs randomly while keeping consistency.
Color Theme - the base color palette applied to the crowd.
Color Variation - degree of randomness added to the override color values.
Mix To Original - blend factor between the original character color and the override color.
Assets
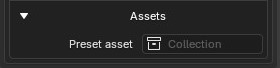
Assets > Preset Asset
Preset asset - collection associating this crowd with a specific preset asset collection.
Instance Override
Instance Override is one of the major new features in Crowd Mixer 2.0. It lets you edit specific
characters at individual positions without regenerating the entire crowd - useful
when most of the crowd already works, but a few people near the camera need specific changes.
Open it from the tab next to Crowd Setting at the bottom of the Crowd Manager panel.
Where each function lives in Instance Override
Click the Instance Override tab, then select a proxy box for the instance you want to edit directly in the 3D Viewport - the Display dropdown picks the proxy shape (e.g. Cube), with Show In Front, Show point name and Visible only select toggles alongside it to make picking easier.
The panel header shows the selected item (e.g. "New Item (25)").
Adjust the instance with Pos (X/Y/Z), Rot, Scale and Speed - these override that single character without touching the rest of the crowd.
Use Previous / Next to step through instances, or Randomize to jump to one at random; the eye icon is a visible-instance toggle for the override.
Reset Point clears the override on the current instance; Reset All clears every override on the crowd.
Common uses:
Fixing repeated characters - swap out an instance that looks too similar to its neighbors.
Overriding flow speed - change the animation/movement speed of an individual character in the crowd, independent of the group.
General manual adjustment - offset, rotate, rescale or hide a selected individual more deliberately.
Character Customize
Character Customize is where visual variation becomes more deliberate. Instead of only changing
broad crowd values, you focus on how individual character components are selected and presented.
You must first click Customize ON to activate the customization system - once
active, the base character loads and all options (facial features, body shape, clothing and
animations) become available. This keeps the character setup process lightweight when not in use.
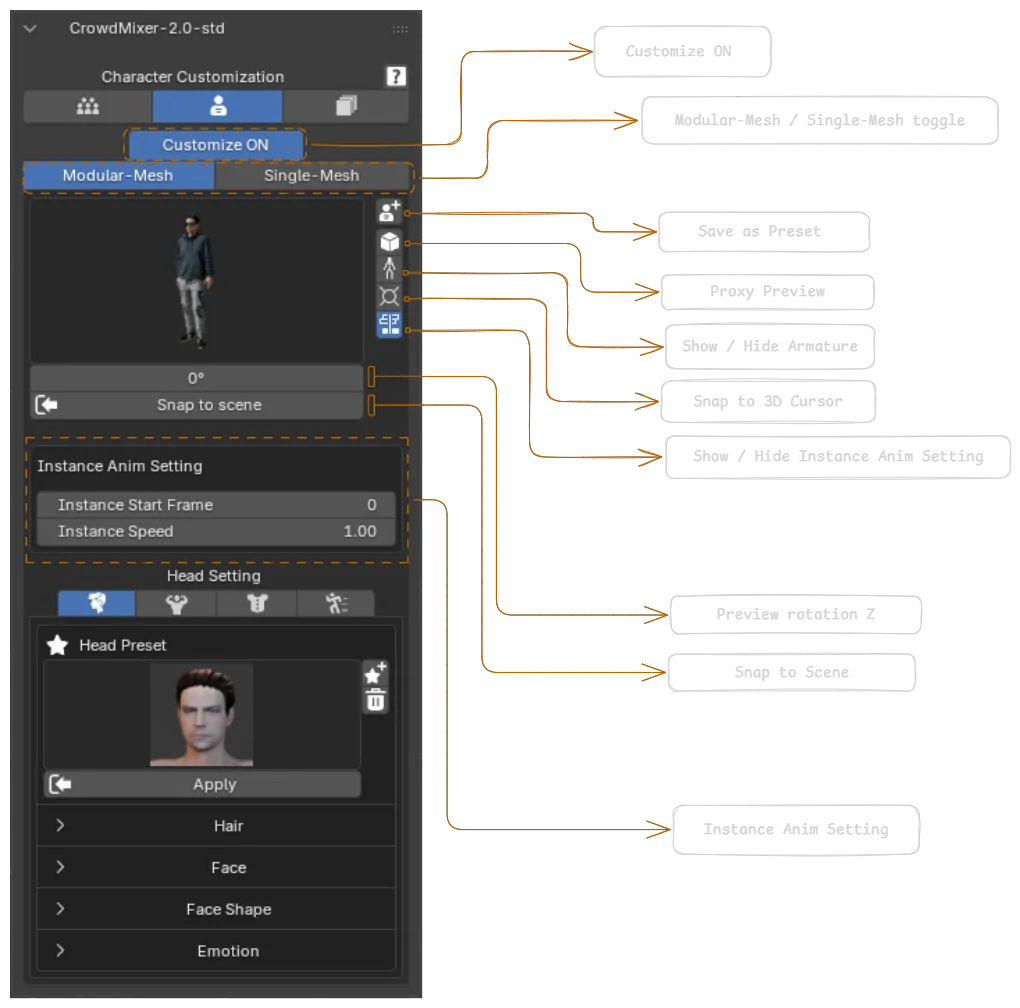
A Modular-Mesh / Single-Mesh toggle at the top switches which character system you're editing:
Single Mesh is the fast character path for quick scene population.
Modular Mesh is the deeper setup that contains head, body, clothes and animation customization.
Snap to Scene fits here when you need character placement to follow scene geometry more precisely.
Panel entry point
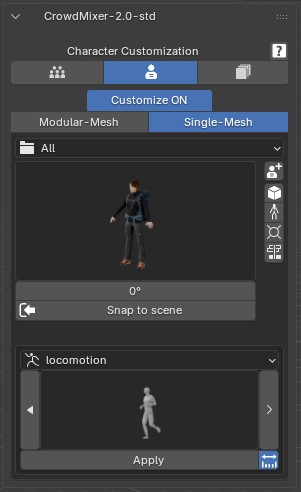
With Customize ON active, the panel shows the character preview and a Snap to scene
button. What appears below that depends on the Modular-Mesh / Single-Mesh toggle:
Modular-Mesh reveals four customization tabs - Head customize, Body customize, Clothes customize and Animation customize - for whichever base character (John or Linda) is currently active.
Single-Mesh instead shows a character list filtered by theme (e.g. Backpacker, Beach, Business) to pick a ready-made character directly. Its appearance can't be edited, but you can still choose and apply an animation to it - the same Animation customize step used for Modular Mesh.
Where each function lives in Character Customization
Individual character placement (Instance Anim Setting)
The 0° field is the character preview's rotation (Z axis), for checking the model from different angles before placing it.
Snap to Scene - places the customized character into the scene as an Instance.
Show / Hide Instance Anim Setting - toggles visibility of the Instance Start Frame / Instance Speed fields below.
Instance Start Frame - sets the starting animation frame for the placed Instance; also applies to other Instances created from the same Source.
Instance Speed - controls animation playback speed for the placed Instance; also works with other Source-based Instances.
Supportive tools
Save as Preset - saves the current character's configuration (clothing, colors, appearance) into the Preset Collection, so it can be reapplied without rebuilding from scratch.
Proxy Preview - displays the character in a low-polygon version with all clothing hidden in the 3D Viewport, for quickly previewing animation without affecting performance.
Show / Hide Armature - toggles visibility of the character's armature in the 3D Viewport.
Snap to 3D Cursor - instantly moves the active character preview to the exact location of the Blender 3D cursor, for precise manual positioning in art-directed layouts.
Head customize
Use head customization to break repetition in close or medium shots. Even small changes here
help a crowd feel less duplicated when multiple characters are visible at once.
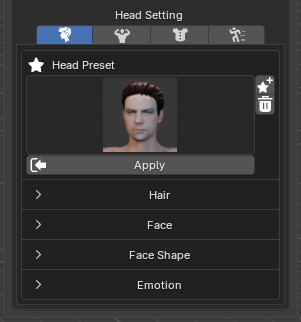
Modular Mesh only, on the two base characters (John and Linda). Head Setting has four tabs - Head, Body, Cloth and Animation - this section covers the Head tab's five collapsible groups.
Head Setting overview
Head Setting overview
The Head tab collapses into five groups, expanded one at a time: Head Preset, Hair, Face, Face Shape and Emotion.
Head Preset gallery
Head Preset
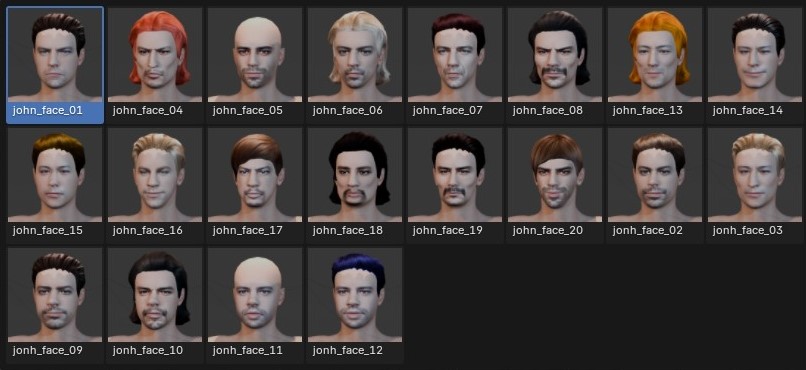
Load previously saved facial configurations for your character. Default presets are included to help beginners get started quickly, and you can freely add or delete presets (star/save and trash icons).
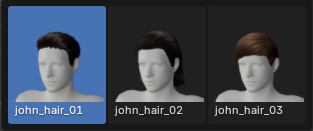
Hair previewHair gallery
Hair
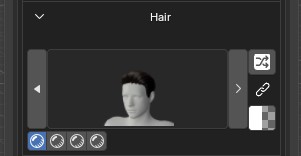
Browse hairstyles (e.g. john_hair_01, john_hair_02...) with previous/next arrows, a shuffle (random) button, a link/unlink toggle, and a color swatch to recolor the hair.
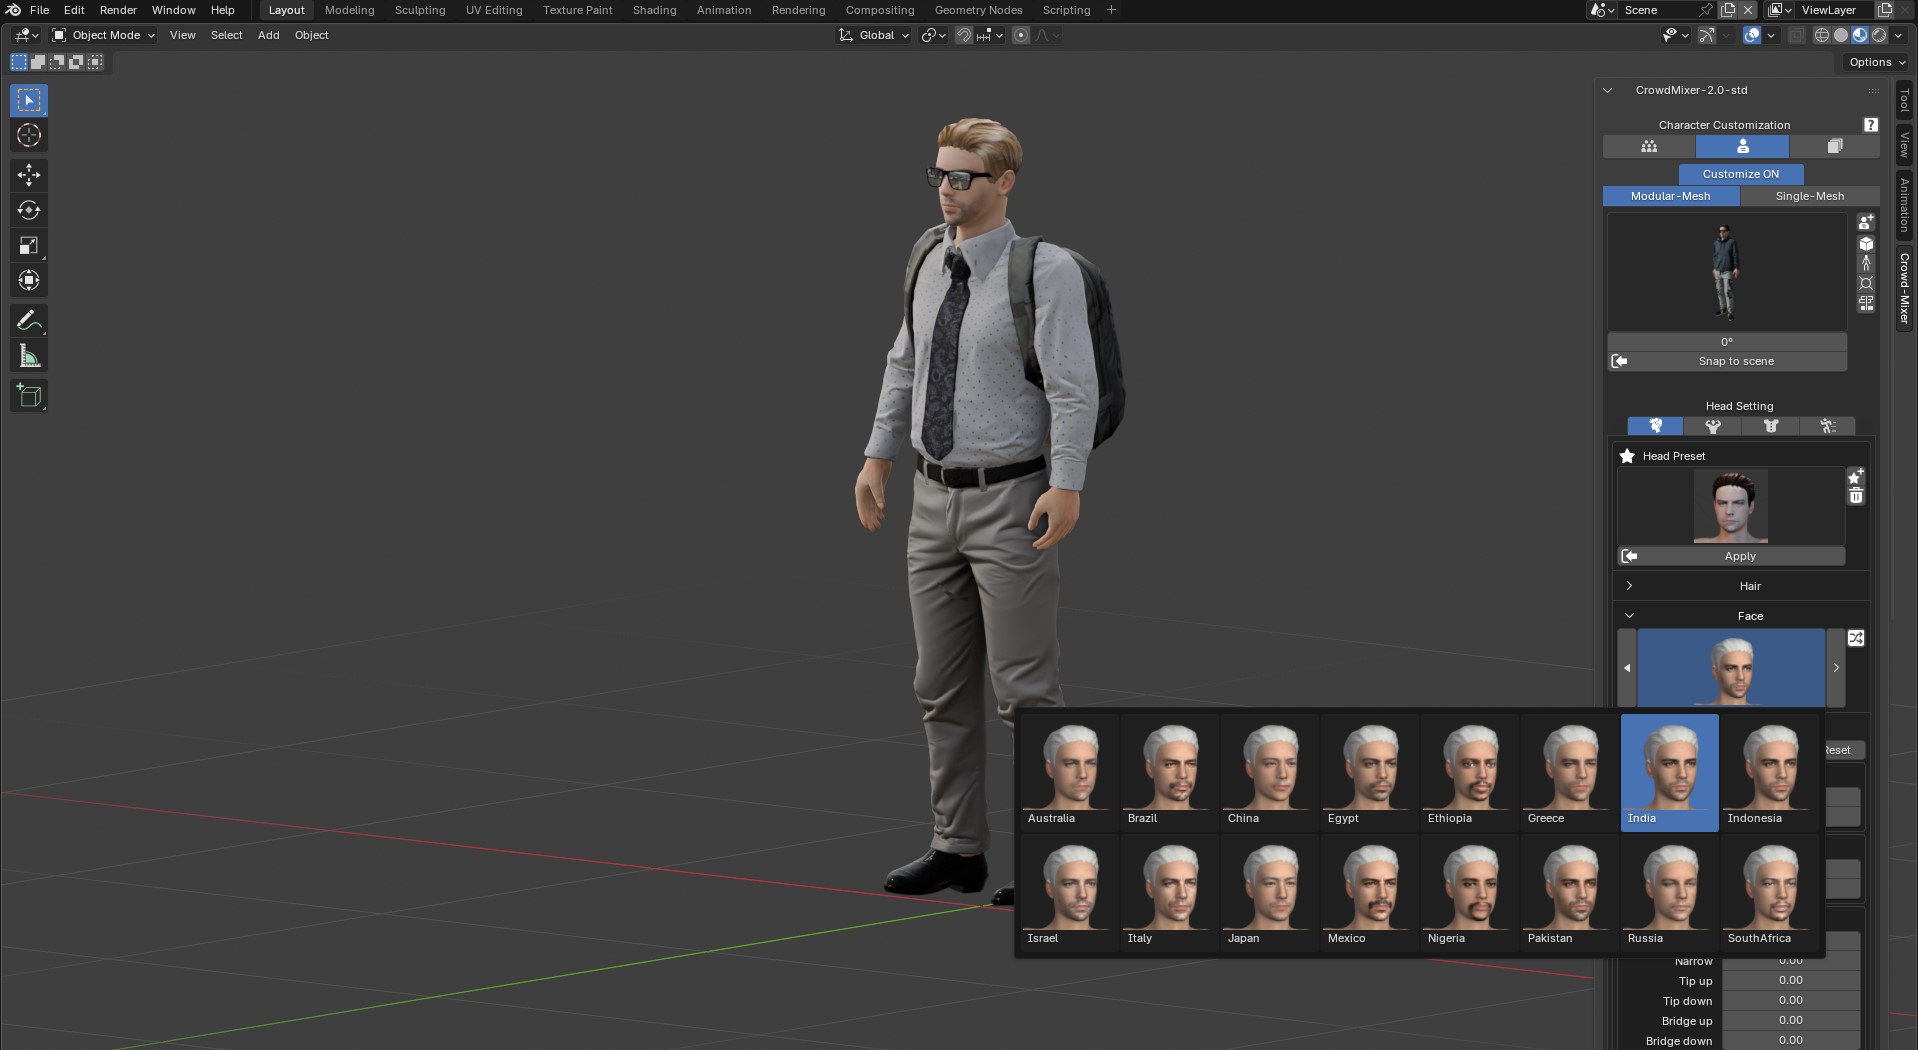
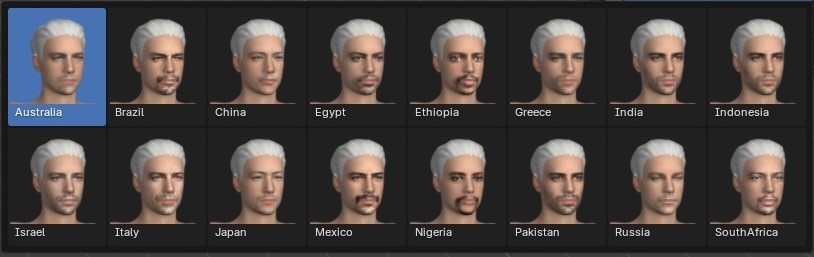
Face previewFace gallery
Face
Applies a base face type from a set of regional/ethnic presets (e.g. Australia, Brazil, China, Egypt, Ethiopia, Greece, India, Indonesia, Israel, Italy, Japan, Mexico, Nigeria, Pakistan, Russia, South Africa) to set the character's facial identity.
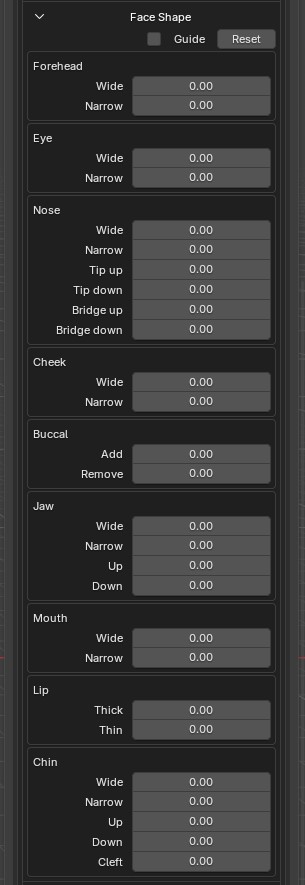
Face Shape sliders
Face Shape
Fine sliders (each with a Guide toggle and a Reset button) grouped by facial region:
Forehead - Wide / Narrow
Eye - Wide / Narrow
Nose - Wide / Narrow / Tip up / Tip down / Bridge up / Bridge down
Cheek - Wide / Narrow
Buccal - Add / Remove
Jaw - Wide / Narrow / Up / Down
Mouth - Wide / Narrow
Lip - Thick / Thin
Chin - Wide / Narrow / Up / Down / Cleft
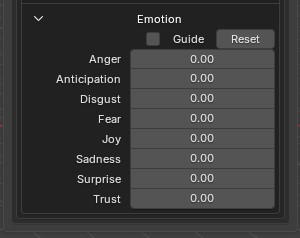
Emotion sliders
Emotion
A Guide toggle, Reset button, and eight sliders based on Plutchik's wheel of emotions: Anger, Anticipation, Disgust, Fear, Joy, Sadness, Surprise, Trust.
Body customize
Body customization changes the base character shape or body asset selection.
This is especially useful when a crowd needs a more controlled visual balance.
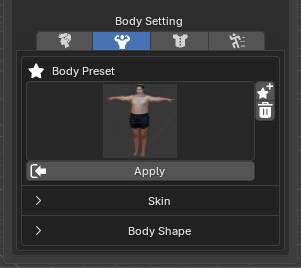
Body Setting overview
Body Setting overview
The Body tab collapses into three groups, expanded one at a time: Body Preset, Skin and Body Shape.
Body Preset gallery
Body Preset
Load previously saved body configurations for your character (e.g. john_body_01...08). Default presets are provided to help beginners get started quickly, and you can add or delete presets freely.
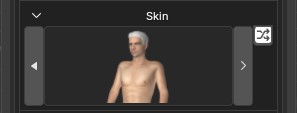
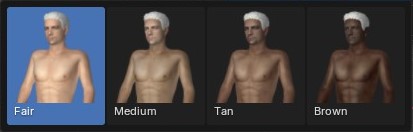
Skin previewSkin tones
Skin
Choose a skin tone: Fair, Medium, Tan or Brown.
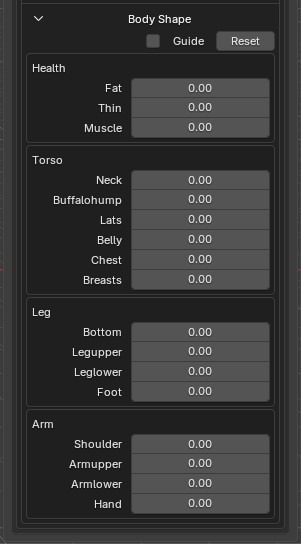
Body Shape sliders
Body Shape
A Guide toggle and Reset button, plus sliders grouped by body region:
Modular Mesh is the deeper character customization workflow in Crowd Mixer 2.0.
This is where you move beyond fast placement and start directing how characters are built.
Where each customization tab livesThe shared per-item control row
The four tabs
The same four-tab bar appears at the top of Head, Body, Cloth and Animation Setting, so you can jump between them without leaving the panel.
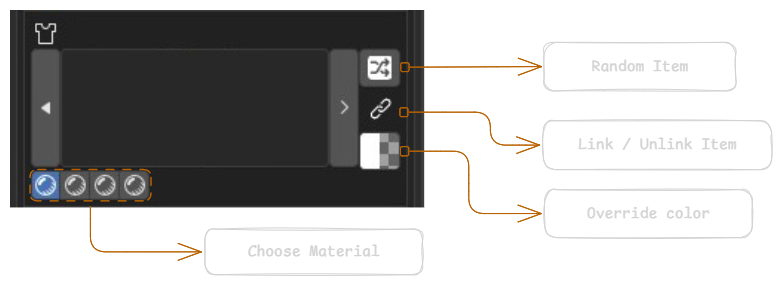
Shared per-item controls
Most item rows across Head, Body and Cloth Setting (hairstyles, faces, skins, clothing pieces) share the same set of controls, alongside the previous/next arrows:
Random Item - picks a random item from the current list.
Link / Unlink Item - shows or hides that item on the character in the 3D Viewport.
Override color - applies a custom color to the item, overriding its default look.
Choose Material - the row of circular swatches below the preview selects which material variant is applied.
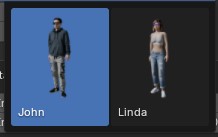
Base characters: John and Linda
Base characters
Everything starts from one of two base characters - John and Linda. Every tab below (Head, Body, Cloth, Animation) customizes whichever of the two is currently active.
Clothes customize
Clothes customization affects outfit variety and helps create more natural distribution across the crowd.
In Standard, this part becomes more important because the modular workflow allows deeper outfit control.
Cloth Setting overviewItem picker, opened from a preview
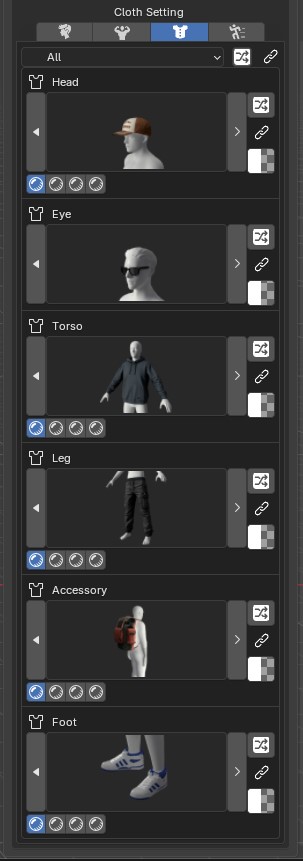
Clothes Item Preview
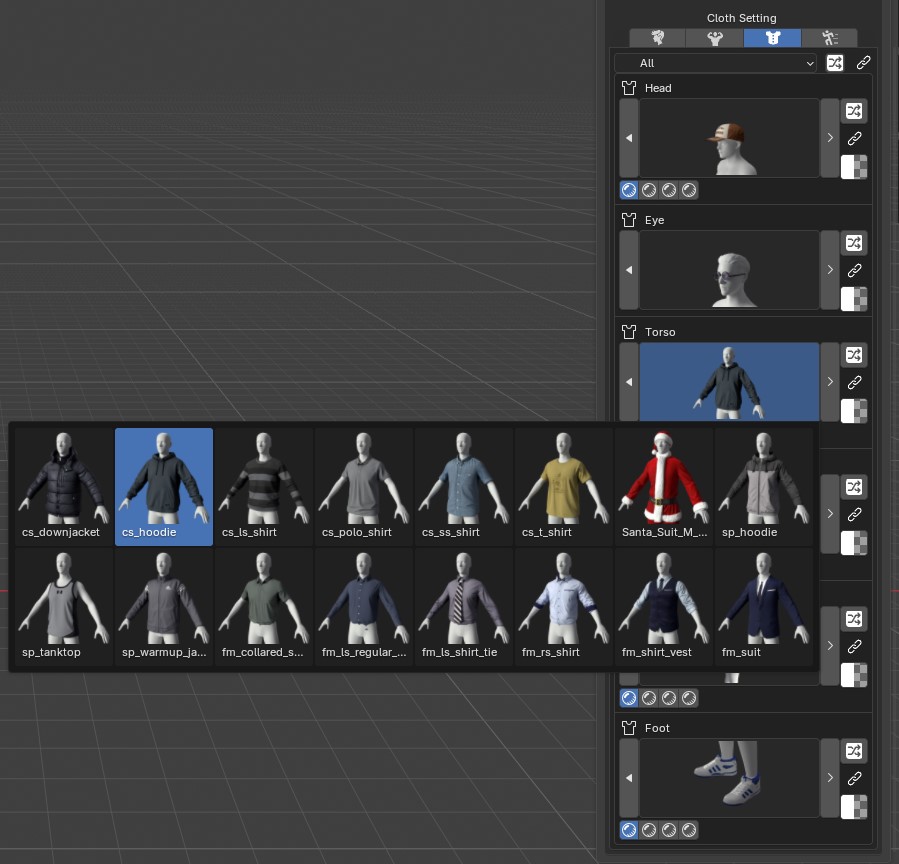
Displays clothing items assigned to six body parts, each as its own row: Head, Eye, Torso, Leg, Accessory, Foot. Clicking a preview opens the full item picker grid for that body part.
Link / Unlink All Item
Enable or disable all clothing assets in the 3D Viewport at once, to preview a character fully dressed or without any clothing assets.
Random All
Randomly generates a complete clothing set based on the currently selected filter category (e.g. if "Sport" is selected, all randomized items come from that category only).
Previous / Next Item
Browse through previous or next items in the list for the selected body part.
Random Item
Randomly assigns a clothing item to a specific body part (e.g. a hat only, or just shoes).
Link / Unlink Item
Enable or disable individual clothing assets in the 3D Viewport, to preview a character with or without specific parts (e.g. hide a jacket or accessory).
Color
Select and apply color to the item. The Alpha value in the color palette controls opacity, to blend or fully override the item's appearance.
Material
Choose the material assigned to the clothing item. Each item may support a different number of materials depending on how it was designed.
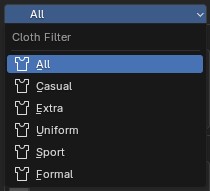
Cloth Filter categories
Cloth Filter
Categorize clothing items by style or function:
Casual - everyday or informal clothing.
Extra - fantasy, costume or other unique style.
Uniform - work/service uniforms.
Sport - athletic or activewear.
Formal - professional or formal wear.
Animation customize
Animation customization applies across both Single Mesh and Modular Mesh
workflows. It lets you align movement style with the crowd type and the scene behavior.
Standing crowds should not feel like walkers, and path-following crowds should not look idle.
Use this section to make sure motion logic matches the role of the crowd in the shot.
Some of the animations included with this add-on are sourced from Mixamo. Their use is
subject to Mixamo's licensing terms - make sure your use complies with Mixamo's guidelines and conditions.
Where each function lives in Animation Setting
Animation Filter
Filter animations by category from a dropdown (e.g. locomotion) covering usage types such as walking, cheering or sign-holding. You can also add your own custom animations - see Update Animation under Main Control to learn how.
Animation picker
Opens the full gallery grid of animations in the current category (e.g. clapping_low, stadium_cheer..., walking_yell) so you can jump straight to one instead of stepping through them one by one.
Previous / Next Item & Animation Preview
Browse through the previous or next animation in the current list; each entry shows a preview icon and name to help you select the most suitable one.
Apply Animation
Applies the selected animation directly to the character. When deactivated, the system resets the animation back to the default pose (T-Pose).
Fit Animation to Time Range
Automatically adjusts the Timeline's time range to match the length of the selected animation (icon next to Apply).
Preset Collection
The Preset Collection is a group used to store saved character presets for future reuse. Presets can
also be used as a source for crowd generation, letting you quickly populate scenes with consistent
character styles.
The panel has two views: a normal view, where you browse and apply character presets
organized into collections, and an Edit Preset mode (activated via the Edit Preset
button), which adds controls to rename a preset, delete a preset, or overwrite the selected preset
with the currently customized character.
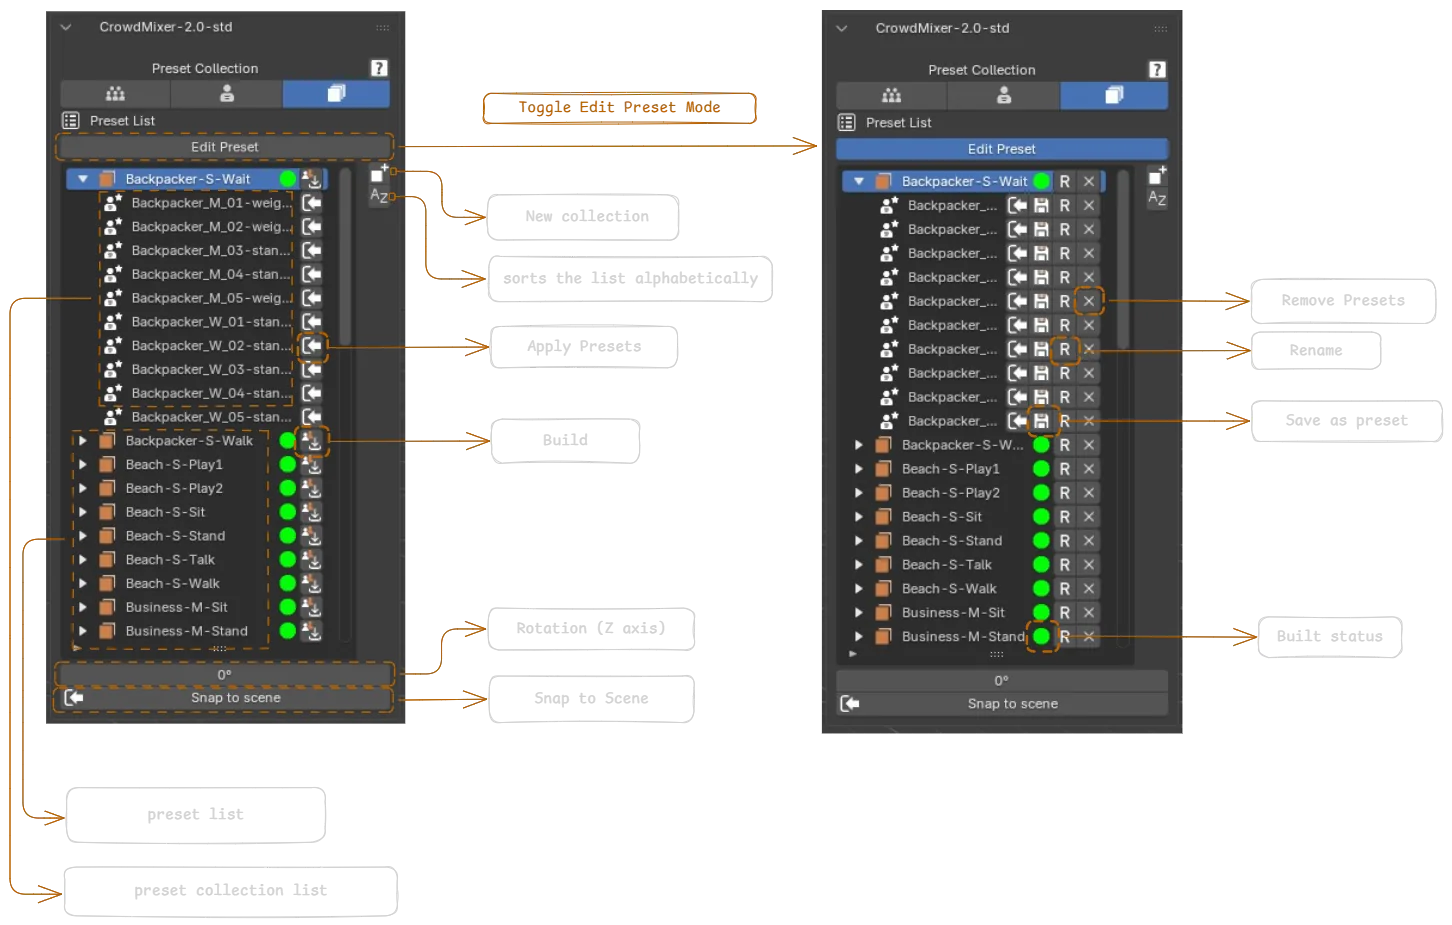
Where each function lives, in normal view and Edit Preset mode
Each collection (folder icon) can be expanded to show its individual character presets (person icon).
A green dot next to a collection is its Built status - it's already been built into a source file.
The New collection icon (top right) adds a new collection, and the A-Z icon sorts the list alphabetically.
Toggle Edit Preset Mode switches between the normal view (Apply Presets, Build) and edit controls per row - Rename, Save as preset (overwrite with the current character) and Remove Presets.
Character Preset
A Character Preset stores the entire configuration of a character - body shape, face structure,
clothing, hairstyle, colors, materials and animations - all together. This lets you quickly reapply
a complete character setup whenever needed, ensuring consistency and saving time.
Apply Presets
Applies the selected preset to the current character. If the preset was saved from a different base
character, the system automatically switches the character to match the preset.
Add / Remove Presets
Selecting an individual preset removes only that preset.
Selecting a collection removes the entire collection along with all its presets.
Edit Presets & Collections
Rename or delete presets, and overwrite the selected preset with the currently customized character.
Build
Crowds don't pull data directly from Character Customization - they use source files
that have already been prepared and built, so you can think of a source as a ready-to-use character
library for your crowds. Once your character presets are ready, use the Build
function in the Preset Collection panel to generate one.
Build creates a source file that can be used by the crowd system.
The generated source file is stored in the CMX_source folder and shares the same name as the preset collection.
After building, return to the Source List and click Add Source to load it into your scene.
Preview and Performance
Large crowds become expensive quickly, so performance tools are part of the normal workflow rather than an afterthought.
Proxy Mode should be your first response when the scene feels heavy.
Visibility control helps you preview only the crowd elements you need to inspect.
Single Mesh workflow can also reduce setup complexity when speed matters most.
FAQ
Which Blender version should I use?
Blender 4.1 or higher for the current Crowd Mixer 2.0 workflow.
What is the main difference between Lite and Standard?
Lite focuses on Single Mesh. Standard adds the deeper Modular Mesh system.
What should I try first when the scene becomes heavy?
Switch to Proxy Mode and reduce visibility before returning to full detail.
Why are my crowd assets missing after installation?
Most often the asset folder path is wrong. Check preferences first.
Do I need to pay to update the add-on?
No, all future updates are free.
Can I use this add-on in commercial projects?
Yes, the add-on is fully allowed for use in commercial projects.
Why isn't the add-on working?
Common causes are an incorrect assets directory path, or using a Blender version lower than supported.
The add-on isn't showing in the 3D Viewport - what should I check?
Make sure the add-on is correctly installed and activated in Edit > Preferences > Add-ons.
A character isn't visible in the viewport - what should I do?
Try restarting Blender, or check your viewport display settings to make sure visibility isn't disabled.